Areas We Cover
Categories
CAN AN AI PHOTO SHOOTER STREAMLINE REAL CREATIVE WORK?
by Lamont Washington | April 25, 2026
in Extras, Technology
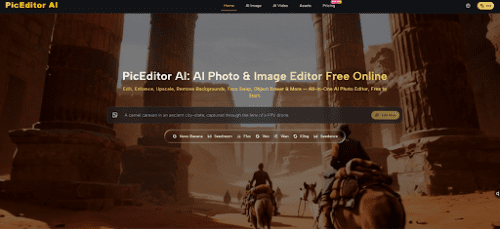
Most of us have wrestled with image editing software that demands hours of tutorials, layer masks, and painstaking manual retouching. The promise of artificial intelligence in photography is not new, but the gap between marketing claims and actual output has often been wide – images can look over-processed, faces become uncanny, and fine detail dissolves into plastic smoothness. It is enough to make anyone skeptical. When I set aside time to explore an AI Photo Editor designed to handle everything from basic enhancement to generative fill and style transfer, I wanted to see whether it could fit into a realistic creative workflow rather than just deliver a one-click gimmick. What I found was a tool that prioritizes control and step-by-step refinement over instant magic, and that makes all the difference.
The platform operates as a web-based hub where you upload an image, select an AI model, and then guide the output through written prompts and reference images. Unlike lightweight mobile apps that trade precision for speed, this editor integrates multiple foundation models and gives you the room to iterate. In practice, that means you can remove an unwanted object, replace a background, enhance resolution, or even generate a short video clip from a still photograph without leaving the browser. The experience is closer to a command center than a wand shop: you do have to describe what you want, occasionally re-roll a result, and accept that the model needs clear instructions. For anyone accustomed to the trial-and-error nature of creative software, this feels familiar rather than frustrating.
Testing the Core Editing Tools with Everyday Images
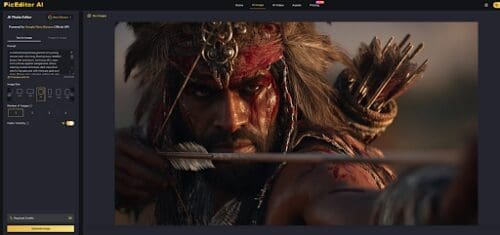
The editing workspace is built around a handful of task-oriented modules, each powered by different AI models. My own tests covered three common scenarios: cleaning up product photos, applying a stylistic transformation to a portrait, and experimenting with the photo-to-video capability. What stood out immediately was that the AI does not silently apply a blanket enhancement; it lets you choose a model, adjust prompt wording, and even supply up to four reference images for style or character consistency.
Removing Objects and Changing Backgrounds
The inpainting and background replacement tools rely on generative models that interpret brush strokes and text prompts simultaneously.
How the Inpainting Engine Handles Complex Textures
In my tests, removing a tourist from a busy street scene worked reliably when the prompt was specific – “remove the person in the red jacket and fill with cobblestone texture.” On the first attempt, the result left a faint shadow that required a second pass. With a slightly refined prompt and a tighter mask, the second generation was clean. This is consistent with my broader observation that inpainting tools working at this level still benefit from iterative prompting rather than a one-shot approach. You can expect usable assets quickly, but the notion of “perfect on the first click” would be misleading.
Background Replacement and Edge Consistency
Replacing a plain studio background with a mountain landscape revealed tight edge detection. Where similar consumer apps sometimes bleed foreground colors into the background, this platform maintained a crisp silhouette around the subject’s hair and shoulders. However, I noticed that the realism of the new background depended heavily on the chosen model; the Nano Banana series produced more photorealistic depth of field and lighting consistency, while lighter models sometimes left the subject looking pasted in. That choice of model becomes part of the creative decision-making and is worth understanding before committing to a batch of images.
Style Transfer That Preserves Facial Structure
Artistic filters have a reputation for morphing faces into caricatures. This editor’s style transfer offers a more measured approach.
Keeping Character Identity Across Multiple Renderings
During my experiment with a watercolor portrait transformation, the AI preserved eye shape, jawline, and expression far better than I expected. The option to anchor the output with reference images strengthened this consistency further. When I used the same person’s photo as a reference for four successive style variations, the facial geometry stayed notably stable. In contrast, running each generation without a reference led to slight but cumulative drifting – a worthwhile trade-off to understand if you are building a series with a consistent persona.
Choosing the Right Model for Organic Textures
The Nano Banana model again showed its strength in producing brushstroke-like textures that felt organic rather than algorithmic. My observation is that heavier models consume more credits but deliver a painterly quality that stands up to zooming, whereas budget-friendly models can leave a faint grid artifact in areas of high detail. This was by no means a dealbreaker, but it highlights the importance of previewing outputs at full resolution before marking a project complete.
From Static Shots to Short Motion Clips
The photo-to-video feature converts a still image into a brief animated sequence, adding subtle motion to elements such as water, hair, or clouds. It is important to frame this capability with realistic expectations: this is not a full cinematic physics simulation, but rather an intelligent interpolation guided by the content of the image.
In my trial, a landscape photograph with a lake gained gentle rippling and drifting mist that remained loopable for around three seconds. A portrait with flowing hair saw natural, sway-like motion that avoided the jelly effect often seen in older frame-interpolation demos. I would describe the outcome as looking more stable and temporally coherent than consumer-grade motion filters, though fast-moving subjects or complex occlusions will still exhibit warping. Recent advances in diffusion-based video generation, discussed by research groups at Runway and in papers on temporal consistency, have made short-form motion from stills far more viable, and this editor’s output sits in line with those broader trends. Still, I found that getting a usable result sometimes required two or three takes, especially when the initial crop or composition confused the motion vectors. Patience pays off.
How the Platform Guides You Through an Edit
Working inside the editor follows a logical sequence that mirrors a conventional retouching workflow, but the AI steps in at the points where manual effort would typically spike.
Step 1: Upload and Define Your Edit Area
This initial stage sets the boundaries of what the AI will work on and what it should leave untouched.
Choosing the Right Input Resolution
The platform accepts a range of file sizes, but I noticed that starting with the highest resolution available to you gives the models more data to work with. Low-light or heavily compressed JPEGs sometimes confused the enhancement module, causing it to over-sharpen noise rather than real detail. A clean, well-exposed source image consistently produced stronger results in both enhancement and generative tasks.
Masking and Prompt Writing
The brush mask interface is straightforward – you paint over the region you want to modify and pair it with a short descriptive prompt. I found that using natural language prompts of around five to ten words yielded the most predictable edits. Prompts that were overly vague (“make it better”) produced inconsistent results, while overly specific long-form instructions sometimes seemed to be partially ignored. A balanced directive such as “replace the cluttered desk with a clean wooden table in soft morning light” worked well.
Step 2: Select an AI Model and Generate
The model selection screen presents multiple options with clear credit costs and suggested use cases.
Matching Models to Use Cases
My testing taught me that different models excel in different areas. For photorealistic object removal, AI Image Editor workflows built on Flux Kontext variants delivered reliable texture blending. For artistic style transfer, Nano Banana produced richer color palettes. The Seedream series offered a middle ground for quick drafts. I would recommend experimenting with a small credit budget on a single image across two or three models before processing a full batch; the output variation can be significant, and your visual preference may not align with the most expensive option.
Interpreting Generation Credits and Trial Limits
Each model action consumes a defined number of credits. During my sessions, typical enhancement runs cost between 30 and 40 credits, while more complex video generation with the Veo model rang in around 100 credits. The platform offers a free starting tier that allows you to run a handful of tests, which is helpful for getting a feel for the quality without financial commitment. For anyone planning to edit more than a few images per day, the monthly plans make the credit economy more predictable, but the free tier serves its purpose as a low-risk trial sandbox.
Step 3: Refine or Download the Output
After each generation, the editor surfaces the result side by side with your original, allowing for quick comparison.
Iterative Refinement for Tricky Edits
I regularly needed a second pass on complex inpainting jobs and motion generation. The “refine” option kept the same prompt and mask active, making it easy to re-roll. A small observation: each refinement subtracts credits again, so it is economical to review the output carefully and adjust the prompt slightly rather than blindly hitting regenerate. When I did tweak the wording, the improvement was often remarkable.
Export Settings and Commercial Usage
Download options include full-resolution PNG and standard JPEG formats. The platform’s terms explicitly grant full commercial usage rights on content you create, which is a significant differentiator from some AI generators that retain partial ownership. For freelance designers and small business owners, this clarity removes a layer of legal anxiety that has lingered around AI-generated assets.
Side-by-Side: AI-Assisted Editing Versus Traditional Manual Workflows
Having used both pixel-level editors and AI-driven tools, I can point to moments where the time saving is tangible and moments where manual control still wins. The table below contrasts a few representative tasks.
| Task | Traditional Manual Workflow | AI Photo Editor Workflow |
| Object Removal | Manual cloning, healing brush, up to 20 minutes per complex area | Brush mask + prompt, processed in under 30 seconds; occasional second pass needed |
| Background Replacement | Pen tool path creation, refine edge, color matching, 15–45 minutes | Single prompt and brush mask, typically clean edges, under one minute |
| Artistic Style Transfer | Action scripts or manual filter layering with unpredictable results | Model selection + prompt, 10–30 seconds; reference images keep identity stable |
| Image Enhancement | Adjustment layers for sharpness, noise, and tone, 5–15 minutes | One-click AI enhancement with sliders; best results on high-quality source files |
| Photo to Short Video | Requires video editing timeline, keyframes, motion graphics, 1–2 hours minimum | Single upload and prompt, 30–60 seconds; motion quality varies with image complexity |
| Batch Consistency | Replicate manual edits with recorded actions; risk of misalignment across images | Reference image system, stable character rendering with Nano Banana model |
The table highlights a clear pattern: the AI-driven workflow slashes the time required for common editing tasks, but it introduces a layer of prompt tuning and model selection that has its own learning curve. For repetitive, high-volume work, the trade-off leans strongly toward the AI approach. For a single hero image that demands pixel-perfect compositing, a traditional editor remains hard to beat. The value of this platform lies in covering the middle ground – tasks that are too complex for a one-tap mobile filter but not so critical that they justify a full manual retouch session.
Where the Experience Could Improve
No tool is without its rough edges, and being transparent about them makes the evaluation more useful. The outputs are undeniably dependent on prompt quality; a poorly worded prompt or an ambiguous mask will produce disappointing results, and the system does not offer much feedback on why something failed. I also noticed that the photo-to-video module sometimes introduces subtle color shifts between frames, which can break the illusion of a seamless loop. When working with low-light images, the enhancement algorithm occasionally amplified grain rather than resolving detail, so pre-processing noisy files might still be necessary. Finally, while the credit system is transparent, the variance in cost between models means that heavy experimentation without a plan can quickly consume a trial quota. None of these are fundamental flaws; they are the kind of bottlenecks that remind you that you are collaborating with a machine, not commanding a genie.
A Measured Take on AI-Driven Image Editing
My time with this AI photo editor left me with a balanced impression. On one hand, the speed and flexibility are undeniable; tasks that once took an afternoon can now be done during a coffee break. The ability to preserve character identity across style transfers and the option to loop in multiple reference images make it genuinely useful for serial content creation. On the other hand, it is not an eraser of craft knowledge. Understanding composition, lighting, and the principles of a good prompt still separates a polished result from a generic one. The platform feels built for people who already know what they want but are tired of executing it with a mouse and stylus. It rewards a light touch, iterative thinking, and a willingness to meet the AI halfway. If you approach it as a capable collaborator rather than a replacement for judgment, you will likely find a place for it in your creative toolset.